Optimize performance and comfort for your remote work.
Introduction
Reemo Desktop provides secure and high-performance remote access to your physical workstation and virtual machines. It allows you to work from anywhere while keeping the full performance of your remote machine. Connections are simple, stable, and designed for professionals who need reliable access to their environment at all times.
With Reemo Desktop, you benefit from high-performance, low-latency sessions combined with centralized control and user management. The infrastructure is built to be secure and dependable, ensuring that every remote connection feels as responsive as local work.
To get the most out of it, it’s essential to configure both your local and remote environments properly.
This guide explains how to prepare your setup, optimize your performance, and maintain a stable, secure connection day after day.
1. Daily usage and performance optimization
1.1 Network connection
For professional use and real-time responsiveness, the network stability between your local machine and the remote workstation is more important than raw download speed.
To optimize Reemo, we highly recommend connecting your computer to an Ethernet network.
Wi-Fi can cause:
Latency spikes (the cursor feels "sticky," delays in stylus input).
Packet loss (pixelated images / micro-stuttering).
Bandwidth saturation (other users on the same Wi-Fi streaming video, syncing backups, etc.).
You can check your connection at https://reemo.io/test. This ensures that Reemo can connect under optimal conditions (direct/UDP).
To measure your speed, use https://speedtest.net or https://nperf.com.
1.2 The browser
Reemo Desktop runs in your browser and uses the WebRTC protocol. Your browser is therefore your client. To ensure stable performance: Use the latest version of Google Chrome, Safari, Firefox, or Microsoft Edge.
Work in full-screen mode. Full-screen:
Improves cursor tracking (particularly visible with a stylus).
Prevents accidental clicks outside the window.
Provides a more accurate sense of display scale.
Expert Tip: If the image seems delayed or the video is stuttering, open the Reemo toolbar and adjust settings such as Resolution, FPS, or Bandwidth/Quality. Reducing these values can stabilize performance without modifying the host GPU settings.
1.3 Mastering the Reemo Toolbar
During a session, the Reemo toolbar allows you to dynamically adjust performance without modifying the remote host’s hardware settings.
1.3.1 Optimizing bandwidth
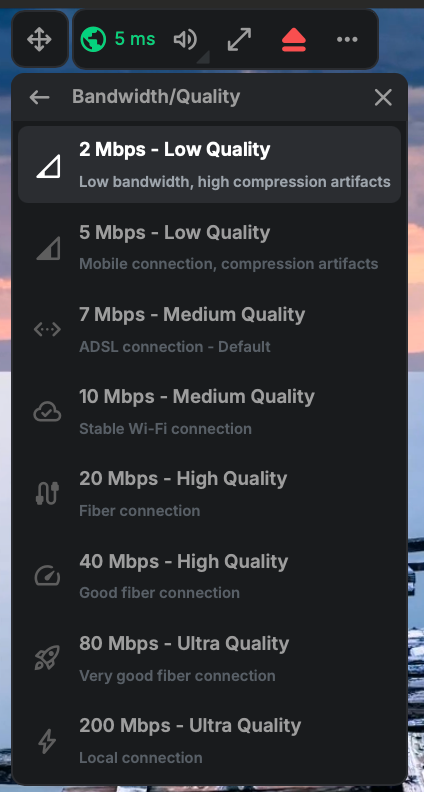
The bandwidth setting in the Reemo toolbar is the primary lever for balancing image quality and responsiveness.
Ultra Quality (80 - 200 Mbps):
Usage: Extreme precision work, color grading, or local graphics (LAN).
Recommendation: 200 Mbps is reserved for very high-performance local connections. For excellent fiber, 80 Mbps guarantees an image with no visible compression.
High Quality (20 - 40 Mbps):
Usage: Daily production, 3D, video editing.
Recommendation: The 40 Mbps tier is ideal for a standard fiber connection. If your network is shared, drop to 20 Mbps to maintain constant fluidity.
Medium Quality (7 - 10 Mbps):
Usage: Office work, IT administration, wireless networks.
Recommendation: Use 10 Mbps for a stable Wi-Fi connection. If you are on an ADSL connection, prioritize the 7 Mbps (Default) tier.
Low Quality (2 - 5 Mbps):
Usage: Degraded mobile connection, low-coverage areas.
Recommendation: To be used as a last resort. The 5 Mbps tier is optimized for mobile connections, while 2 Mbps allows the session to remain active despite heavy compression artifacts.
1.3.2 Fluidity and Responsiveness (FPS)
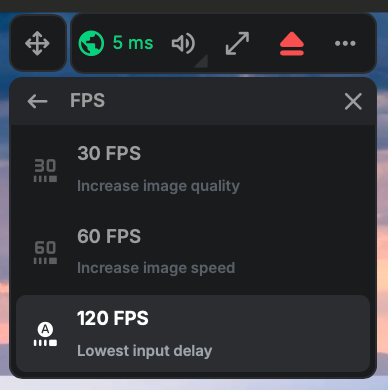
The FPS (frames per second) setting determines the balance between visual quality and display speed. You can adjust it via the FPS menu in the toolbar:
120 FPS - Lowest input delay:
Usage: Ultra-demanding work, gaming, or sessions requiring minimal input latency.
Recommendation: This setting offers the most immediate responsiveness. Ideal if you have a high-frequency monitor supporting 120 FPS and a very stable connection for a "local-like" feel.
60 FPS - Increase image speed:
Usage: Video editing, 3D animation, fluid navigation.
Recommendation: The standard for optimal visual fluidity. It offers an excellent compromise between image speed and network load.
30 FPS - Increase image quality:
Usage: Office work, text reading, still image editing.
Recommendation: By limiting the number of frames, Reemo can allocate more bandwidth to the precision of each frame. Use this mode if you need maximum sharpness on a more modest connection.
Expert tip: If you are working on 3D or VFX projects: start by testing the 120 FPS mode for perfect cursor responsiveness. If you find your network struggling to keep up, drop back to 60 FPS to stabilize the stream while maintaining professional fluidity.
1.3.3 Keyboard Settings (Keyboard Mode)
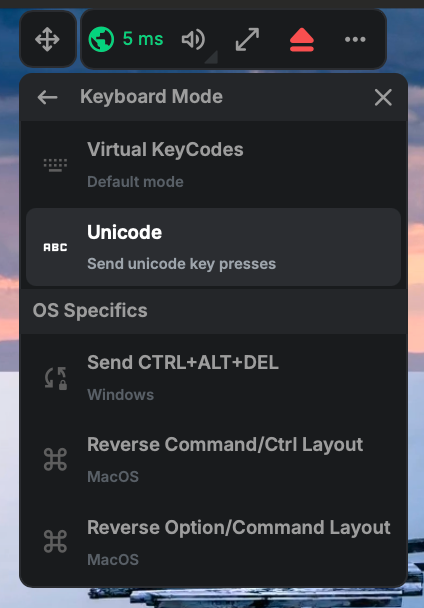
If you encounter difficulties with special character input or if you are working between two different operating systems (e.g., Mac to Windows), use the Keyboard Mode menu:
Input Modes
Virtual KeyCodes (Default mode): The default mode that transmits physical key codes. Preferred for most use cases.
Unicode (Send unicode key presses): Use this mode if certain special characters or symbols do not display correctly. It transmits the character directly instead of the key code.
OS Specifics
Send CTRL+ALT+DEL (Windows): Sends this specific command to the remote Windows machine (useful for locking or the task manager).
Reverse Command/Ctrl Layout (MacOS): If you are using a Mac to control a Windows machine (or vice versa), this option swaps the Command and Ctrl keys to match your shortcut habits.
Reverse Option/Command Layout (MacOS): Allows you to swap the Option and Command keys based on your keyboard mapping preferences on macOS.
Expert tip: Unicode mode is particularly useful if you are using exotic keyboard layouts or if you notice discrepancies with punctuation keys during your session.
1.3.4 Mouse Settings
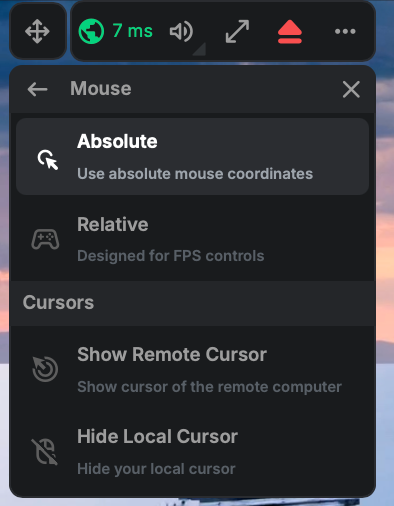
To adapt your cursor behavior according to your activity (office work or 3D software/Games), use the Mouse menu in the toolbar:
Movement Modes
Absolute (Use absolute mouse coordinates): This is the standard mode for office work. The cursor in your session follows the exact position of your local computer's cursor.
Relative (Designed for FPS controls): This mode is essential for first-person shooters (FPS) or 3D creation software. It allows for infinite camera rotation without the cursor getting stuck on the edges of your screen.
Cursor Options (Cursors)
Show Remote Cursor: Displays the cursor generated by the remote computer. Useful for seeing the status of the remote system (e.g., hourglass, window resizing icons).
Hide Local Cursor: Hides your own computer's cursor to only show the one from the remote machine. This avoids the "double cursor" effect and improves immersion, especially in full-screen mode.
Expert tip: If you are working on software like Maya, Blender, or Unreal Engine, we recommend simultaneously enabling Relative mode and the Hide Local Cursor option for a perfectly fluid 3D navigation experience.
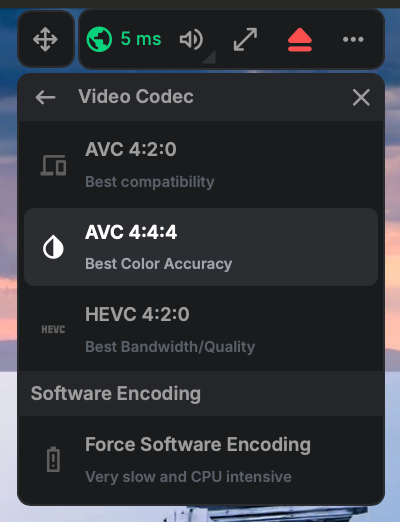
1.3.5 Video Codec
Optimize stream compression according to your needs via the Video Codec menu:
AVC 4:2:0 (Best compatibility): The default setting. Ensures maximum stability for all common use cases.
AVC 4:4:4 (Best Color Accuracy): Recommended for creatives. Offers perfect sharpness on text and total color fidelity (VFX, color grading).
HEVC 4:2:0 (Best Bandwidth/Quality): More efficient for saving bandwidth while maintaining high image quality.
Force Software Encoding: To be used only if your GPU is failing. Warning: very slow mode and high CPU usage.
Expert tip: For artists and creatives, the AVC 4:4:4 mode is the reference setting. It provides perfect sharpness on software interfaces and the chromatic precision essential to your profession.
1.3.6 Monitor Management
Reemo allows you to configure your session display to match your local setup, whether you are using one or multiple monitors.
Display Modes
Splitscreen: Merges all remote screens side-by-side within a single browser window.
Extended: Opens each remote screen in a separate window, allowing you to distribute them across your various physical local monitors.
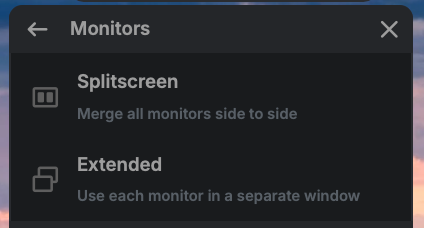
Extended mode allows you to open each remote screen in a separate browser window, enabling you to distribute them across your local monitors.
⚠️ Important: To use this mode, you must disable your browser's pop-up blocker for the Reemo site. If pop-ups are blocked, the additional windows for your screens will not be able to open.
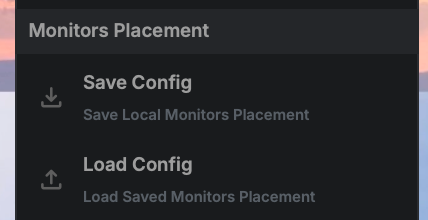
Monitors Placement
Save Config: Saves the current position of your windows on your local screens.
Load Config: Instantly restores your saved screen layout when starting a new session.
Virtual Monitors
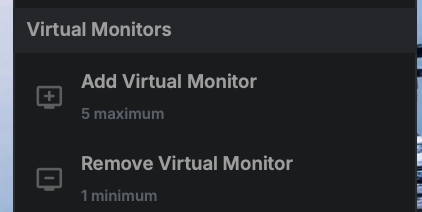
If your remote machine does not have enough physical screens, you can simulate up to 5 virtual monitors.
On macOS: The feature is natively included (no additional installation is required).
On Windows: The driver is included in the Reemo Agent installer. It is necessary to check the dedicated box during installation to enable this option.
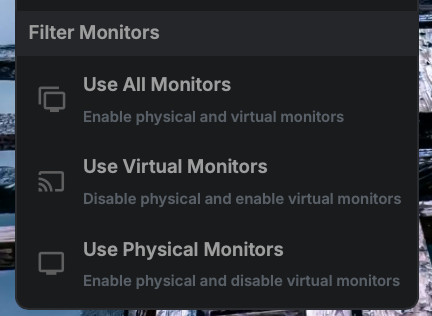
Filter Monitors
You can choose which screens the session should use:
Use All Monitors: Activates all available screens (both physical and virtual).
Use Virtual Monitors: Disables physical screens to use only virtual monitors.
Use Physical Monitors: Disables virtual screens to keep only physical monitors.
Expert tip: For a fluid multi-monitor setup, use Extended mode. Once your windows are positioned on your local monitors, click Save Config. During your next session, a single click on Load Config will instantly restore your entire workspace layout.
2. USB Forwarding
For artists, illustrators, and 3D designers, stylus precision and input latency are critical. Reemo Desktop fully supports professional tablets and styli through its USB Forwarding feature.
The connection is managed at the driver level, ensuring that stylus movement, tilt, and pressure data are transmitted from the local tablet to the remote workstation in real time.
To ensure your tablet and stylus work perfectly with Reemo, here is a short step-by-step setup guide and some tips for achieving the best performance.
On your REMOTE machine (the one you are controlling):
This is where the "work" happens. The machine must be ready to receive new virtual hardware.
Reemo Virtual USB Driver: This driver is now included by default in the Reemo Agent installer for Windows.
Note: If you see an error in the USB menu of the toolbar, it is recommended to reinstall (or update) the Reemo Agent on this machine to ensure the driver is active.
Manufacturer Drivers (Industry Drivers): You must install the official drivers for your hardware (e.g., Wacom drivers, controller drivers, security key drivers) directly on the remote machine.
Why? Once Reemo "transports" the USB signal, the remote machine needs to know how to interpret the device data (pressure, tilt, specific buttons).
On your LOCAL machine (your physical workstation):
Reemo USB Companion: You must download and install this lightweight application from this link
It is available for Windows (x64), macOS (Universal), and Linux (.deb / .rpm).
Once installed, it typically runs in the background in your system tray.
USB Forwarding is available to control a remote Windows or Linux machine, regardless of your local machine's operating system (Windows, Linux, or macOS).
(Note: For a remote macOS machine, this feature is still under development).
If your tablet does not appear:
Restart the USB Companion application on your local machine.
Verify that the tablet drivers are installed and up to date locally.
Reconnect your tablet.
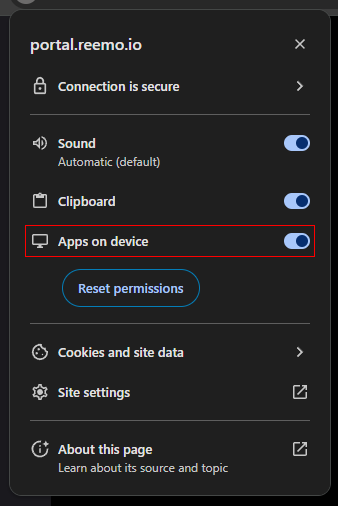
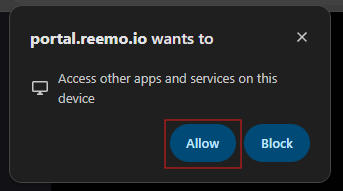
⚠️ WARNING: Chrome Permission for USB Forwarding
Recent Chrome updates require a new permission to access localhost addresses. This is essential for USB Forwarding to work.
Action: When prompted, click "Allow" for the "Apps on device" permission.
Note: This is a one-time setup per device (similar to microphone access).
Fix: If you accidentally blocked it, re-enable it via the "Site Settings" icon in your browser address bar.
3. Network & Firewall Prerequisites
The Reemo Agent and the Web client communicate via WebRTC and secured WebSocket connections.
For Reemo to function correctly, the required network ports and protocols must be open for outbound communication.
You can find the full and up-to-date list of required ports, protocols, and relay configurations in the official documentation here: https://doc.reemo.io/fr/network/matrix.html
After any firewall or proxy changes, you can verify connectivity using the network test page: https://reemo.io/test
4. Troubleshooting
This section is designed to help you with the most common issues you may encounter while using Reemo. Please review these steps to resolve potential performance or connectivity problems before contacting technical support.
4.1. Windows Support
I can't see my mouse pointer
Windows requires a physical mouse to be plugged in to your target computer to show the mouse pointer.
Alternatively you can search for “mouse keys” in the start menu and enter into the "Control the mouse pointer with the keyboard" selection.
Once in the settings you can turn the option On and then deselect the "Only use Mouse Keys when Num Lock is on" option. Your options should look something like this: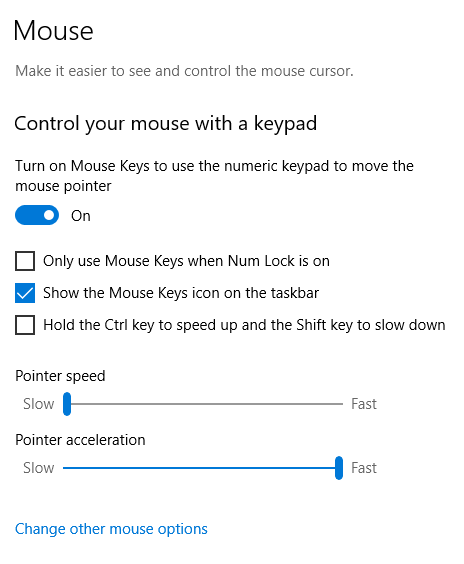
How do i use a gamepad/controller with Reemo on Windows ?
Reemo requires the installation of the Windows ViGEm driver (https://github.com/ViGEm/ViGEmBus/releases ) on your remote computer. Reemo 1.9.0.0 or higher is required in order to ensure compatibility with the Virtual Gamepad Emulation Bus driver.
Reemo's <a href="https://reemo.io/reemo-desktop" target="_blank" rel="noopener noreferrer">remote desktop service</a> requires at least one monitor to be plugged in to capture your desktop. If you do not wish to have monitors or want to add more monitors to your Reemo enabled computer, you can buy some cheap HMDI or Display Port dongles that mimicks a monitor and plug them to your GPU. https://gamepad-tester.com
Why is my Screen Black ?
Reemo's remote desktop service requires at least one monitor to be plugged in to capture your desktop. If you do not wish to have monitors or want to add more monitors to your Reemo enabled computer, you can buy some cheap HMDI or Display Port dongles that mimicks a monitor and plug them to your GPU.
My Computer is "Offline"
If you are sure that your computer is on (not sleeping) and connected to internet, please also check that the Reemo Service is up and running and that your Private Key is correct.
My Reemo is not up to date
Please check that the Windows Service "Reemo Auto Updater" is up and running.
4.2. Linux Support
I cannot see my login screen
Reemo's remote desktop service only support capturing X.Org Server, please ensure that your login screen does not use Wayland.
Follow this tutorial to disable Wayland.
My screen is black
Reemo only support capturing X.Org Server, please ensure that your desktop does not use Wayland. For example for Fedora (using Wayland as default), please follow this tutorial.
My keyboard sends the wrong keys
You can turn "Unicode Keyboard" ON or OFF during a session to send characters instead of keypresses.
I can't hear my desktop sounds
You need to setup your system to allow Reemo to capture system sounds. Please follow this tutorial While connected to your target computer using Reemo, setup the Recording Tab of pavucontrol for Reemo to "Monitor of Built-in Audio Analog Stereo".
My Computer is "Offline"
If you are sure that your computer is on (not sleeping) and connected to internet, please also check that the Reemo Service is up and running and that your Private Key is correct.
How to Update Reemo on Linux
To update Reemo, please run the install script located on the download page, it will handle the update for you and can be done while connected through Reemo: Download Page
How to Uninstall Reemo on Linux
To uninstall Reemo, please run the following commands:
sudo systemctl stop "reemod.service"
sudo systemctl disable "reemod.service"
sudo rm /etc/systemd/system/reemod.service
Debian Based Distributions
sudo apt remove reemod
Fedora
sudo yum remove reemod
Arch Linux
sudo pacman -R reemod
4.2. MacOs Support
I can't see my desktop
Starting with MacOS Catalina, Reemo requires Screen Recording Permissions. Please make sure that Reemo is given proper permissions on your Mac.
I can't send mouse or keyboard events
Reemo requires Accessibility Permissions. Please make sure that Reemo is given proper permissions on your Mac.
I can't hear my desktop sounds
On macOS versions prior to macOS 13 Ventura, Reemo for macOS requires installing the BlackHole (2ch) audio driver to enable system sound capture. You can install it via Homebrew with the command:
brew install blackhole-2ch
My keyboard sends the wrong keys
You can turn "Unicode Keyboard" ON or OFF during a session to send characters instead of keypresses.
My Computer is "Offline"
If you are sure that your computer is on (not sleeping) and connected to internet, please also check that the Reemo Service is up and running and that your Private Key is correct.
How to Uninstall Reemo on MacOS
To uninstall Reemo, please run the following command:
curl -skL -o /tmp/uninstall_reemo.x 'https://download.reemo.io/macos/uninstall.x' && sudo bash /tmp/uninstall_reemo.x
My remote session on a Mac with a built-in display looks blurry
Due to native macOS display scaling limitations on built-in screens, standard remote sessions may appear blurry.
Solution: Creating and using a Virtual Display bypasses this OS scaling behavior, delivering pixel-perfect resolution and crisp image quality.
Display resolution is incorrect or breaks the host screen after the session
Due to how macOS handles native display scaling, resolution changes can sometimes persist after your remote session ends.
Best practice: We recommend using a Virtual Display during your session. This ensures an optimal resolution while working and leaves your physical screen settings untouched upon disconnection.
Sound is playing on both the host and local computers
By default, macOS routes audio to all active output devices during a remote session.
How to fix: To prevent audio from playing on the host computer, open the macOS Control Center (top right of your host Mac screen) and lower the Sound slider to the minimum.
Sound cuts off when Privacy Screen is enabled
On macOS, native privacy protection prevents simultaneous audio capture and physical screen blanking. If Privacy Screen is activated, the system sound will automatically cut off.
Recommended setup: To maintain full data privacy without losing sound, create a Virtual Display and work directly on it. This keeps the physical screen completely blank while ensuring full audio and data integrity.
5. Contacting Technical Support
If you encounter a technical issue despite following these best practices, please provide the following information to allow for a quick diagnosis:
Information to provide
Date and time of the incident: Specify the time frame during which the problem occurred.
Computer name: Indicate the name of the remote workstation (visible on your Reemo portal).
Connection status: Specify whether the link is Direct or Relay (this data is visible next to the latency in ms in the toolbar).
Browser used: Specify the browser and its version (e.g., Chrome 124).
Debug Procedure (Agent Logs) To analyze the source of a malfunction, support may ask you for the Reemo Agent log files.
Enable Agent Logs (Debug Mode)
To generate the files required for diagnosis, you must modify the configuration on the remote machine:
Edit the reemo.ini file according to your system:
Windows: C:\Program Files\Reemo\service\reemo.ini
Linux: /opt/reemo/reemo.ini
macOS: /Library/Application Support/Reemo/reemo.ini
Add the following lines to the end of the file:
[logger]
severity = 5
Restart the Reemo service to apply the changes.
Collect and send the items Once this process is complete, two new files will appear next to the reemod executable. Please send us:
The reemo.service.log file (network service logs).
The reemo.capture.log file (capture service logs).
Expert tip: Before contacting support, perform a connectivity test at reemo.io/test and attach the results to your request. This often helps immediately identify a blockage related to the local network or firewall.
Creating a support ticket Once all materials are gathered (session information, log files, and screenshots), you can contact us:
By email: Send your request to support@reemo.io
Via the dedicated portal: Submit your ticket directly at support.reemo.io
Our technical team will get back to you as soon as possible to analyze your logs and restore your workflow performance.
Was this article helpful?
That’s Great!
Thank you for your feedback
Sorry! We couldn't be helpful
Thank you for your feedback
Feedback sent
We appreciate your effort and will try to fix the article